Middle Earth SBG – Radagast Arrives to Aid the White Council!

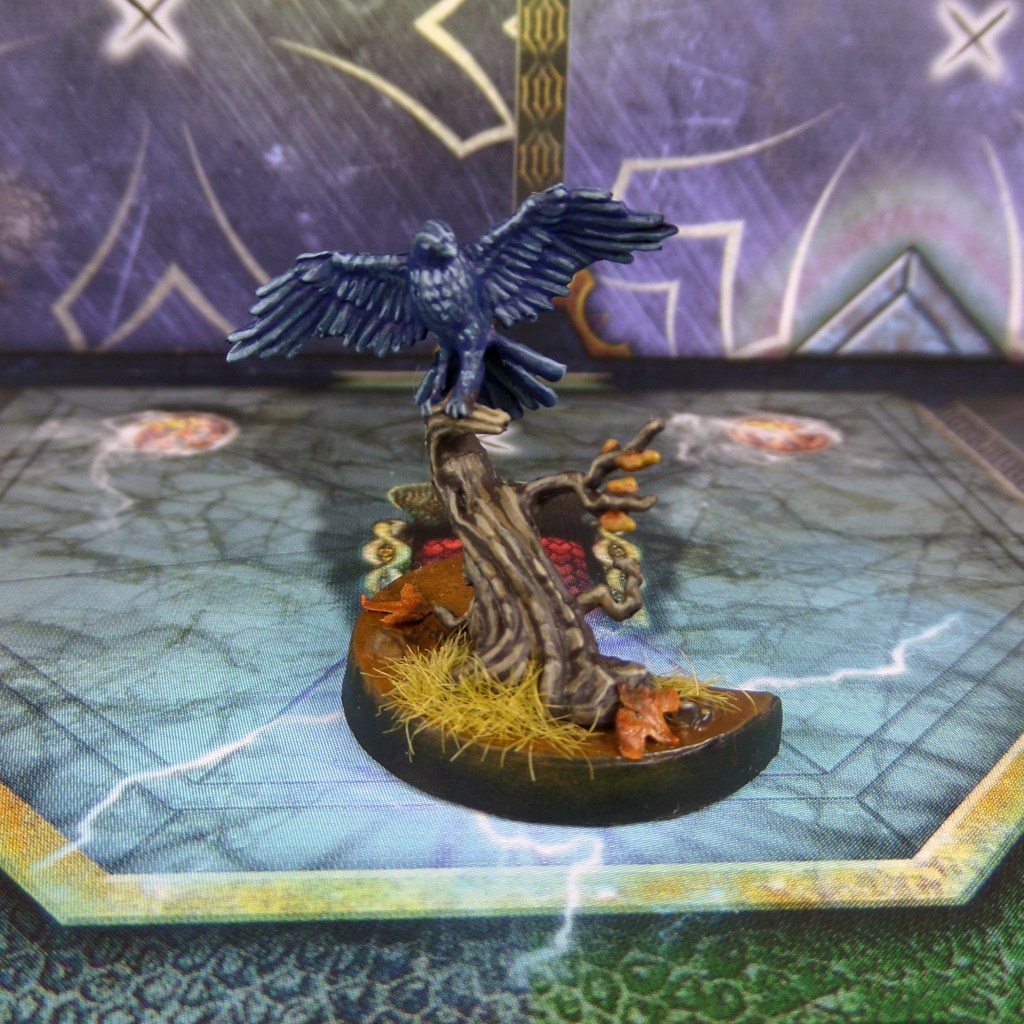
The first of the Istari and definitely the..well…least renowned (unless we’re counting blues), but he does have some massive tricks up his sleeve. Not only an epic sleigh, pulled by Rhosgobel rabbits no less, but also one of the legendary great eagles.

It was a daunting task but the variety of models and base sizes meant some interesting opportunities.

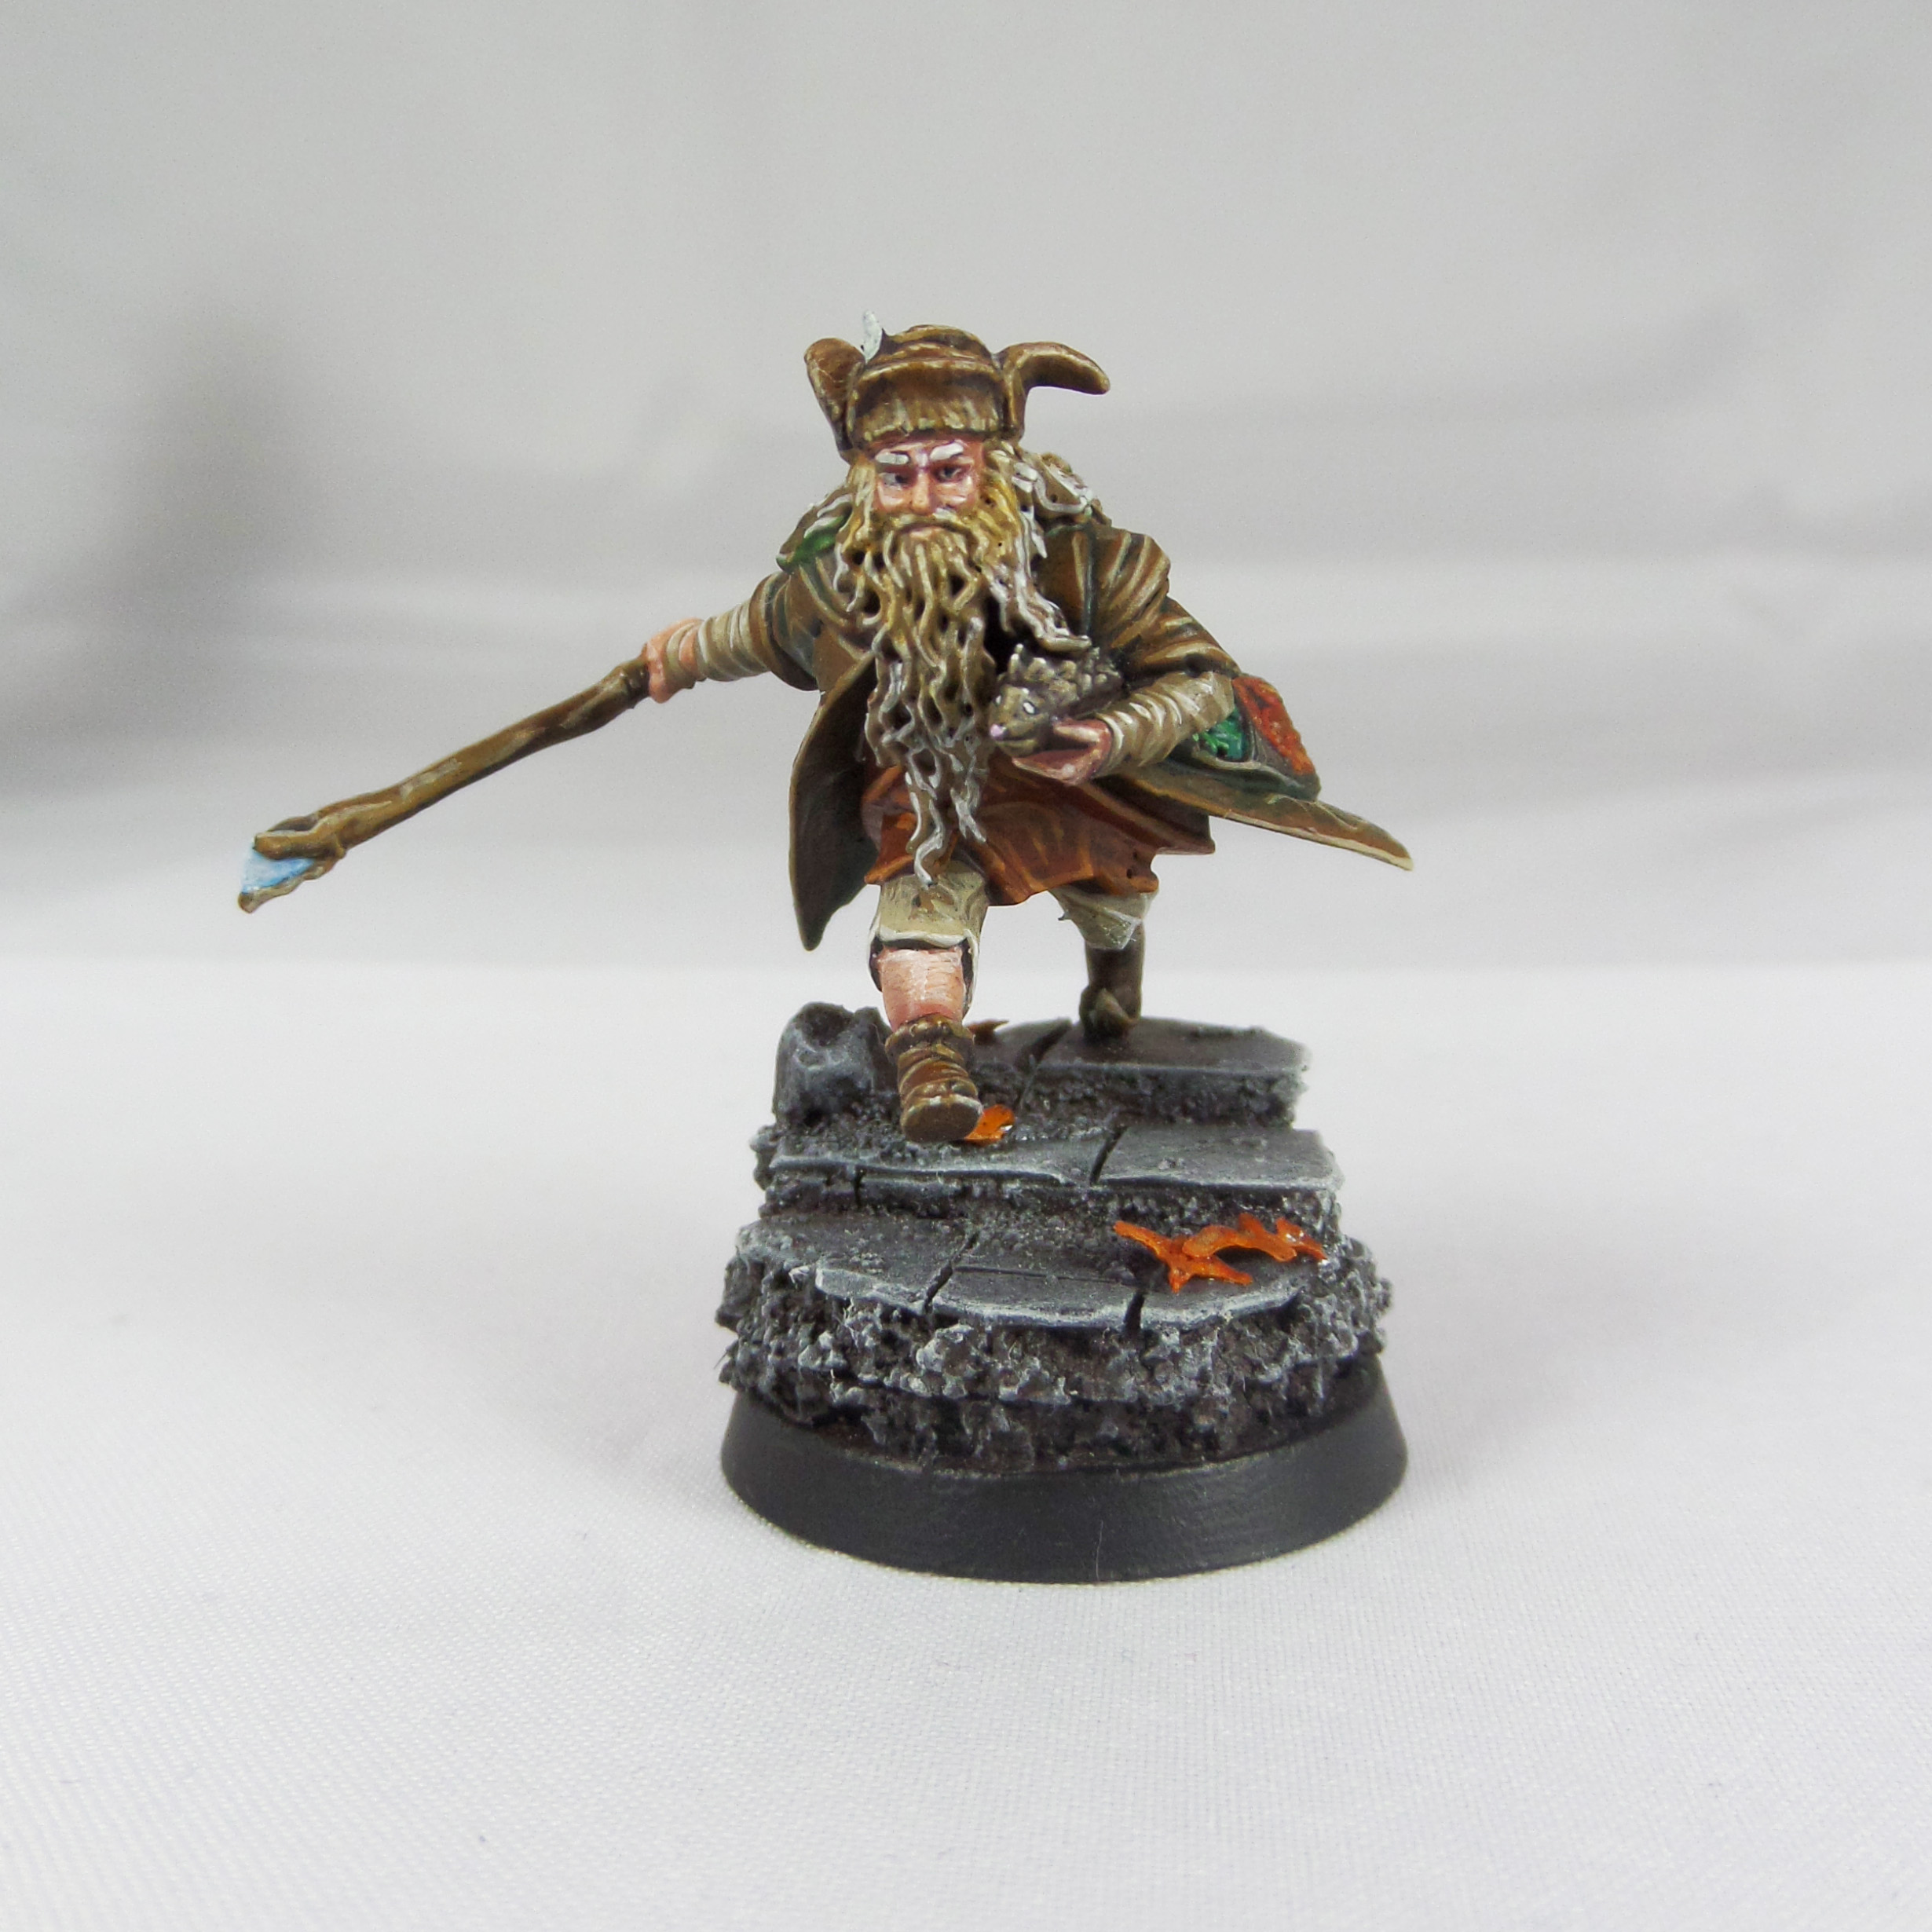
The bases alone where an enjoyable, if sticky, affair. I wanted to continue the Dol Guldur theme, my White Council battling the forces of the Necromancer through the ruins. For the on foot model this meant a fairly simple stepped base, Radagast leaping into the fray, but for the sleigh and eagle I could get a bit more creative.

The sleigh already had a fantastic leaping pose, so rolling with that I created a chasm for them to leap over. This was achieved by positioning the model with blue tac and pencilling in the contact points, as well as a channel for the chasm. Then when I started building the base I could build around these guidelines.

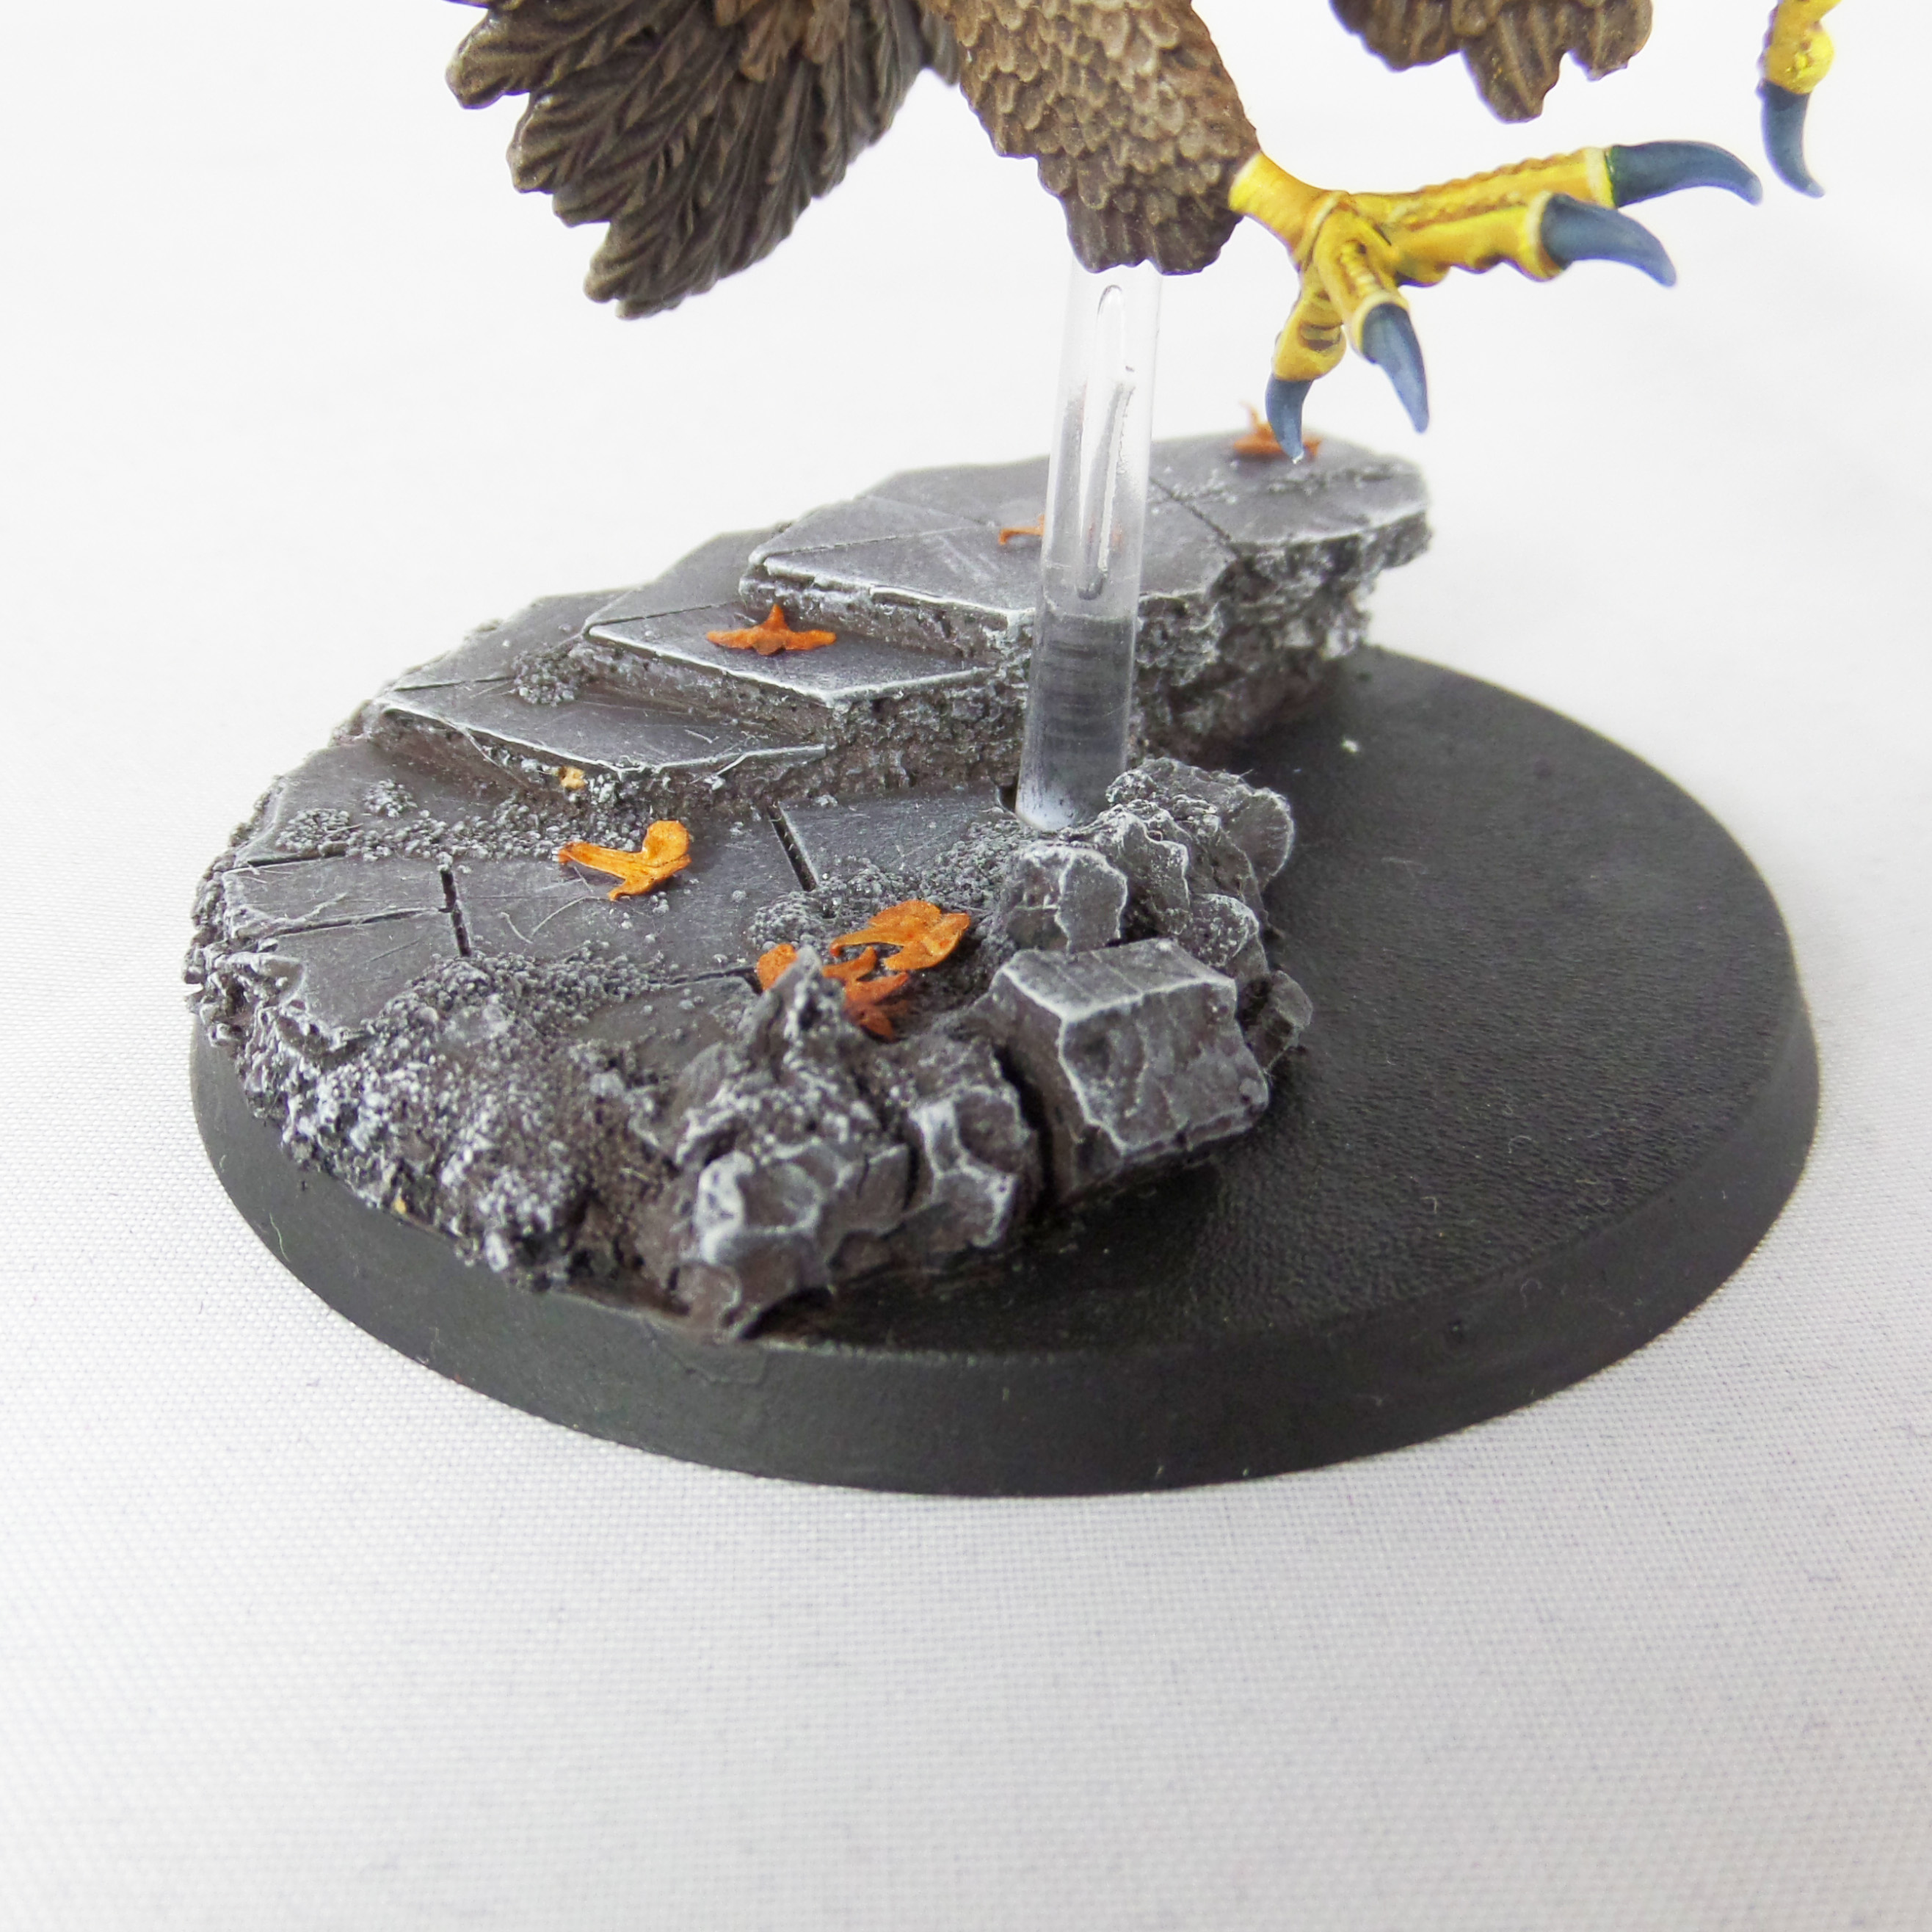
I was free to create anything for the eagles base, just needing a contact point for the flight stand itself. I tried to create something more indicative of Dol Guldur than I had before. I’ll leave it up to you to decide if I pulled it off or not.

Overall I had a blast painting these. The variety of creatures was fun to tackle. I was going to complain about the amount of brown, but that’s definitely something I was forewarned about.

Take a look at the White Council so far…

That just leaves me with 3 members left; Gandalf, Elrond and Saruman. I’m still not sure which one takes my fancy the most.

MCP – Ironman Painting Guide

Welcome to my latest painting guide!

I need your support. Because my guides takes time and supplies to do, any support you can offer would mean the world to me. A supportive message in the comments is enough, but if you have the means why not send me a gift on Ko-Fi or PayPal. Thank you!

Prep: Fully build the model and undercoat black.

Iron Man

Stage 1

Incubi Darkness: Apply a basecoat to the armour.

XV-88: Apply a basecoat to the gold sections of armour.

Stage 2

Thunderhawk Blue: Apply a line highlight to the dark armour sections.

Agrax Earthshade: Apply a wash over the gold sections.

Stage 3

Russ Grey: Apply an edge highlight to the dark armour

Averland Sunset: Apply an edge highlight to the gold sectiosn.

Stage 4

Fenrisian Grey: Apply a spot highlight to the dark armour.

Averland Sunset: Apply a thinned layer to the gold armour, working from the top down.

Stage 5

Blue Horror: Apply a spot highlight to the dark armour, where two or more lines meet.

Phallanx Yellow: Apply a spot highlight to the gold armour.

Glow

Stage 1

Bloodletter: Apply a glaze over the light sources, and bleeding out around them.

Stage 2

Evil Sunz Scarlet: Apply a layer to the centre of each light source, and an edge highlight around them.

Stage 3

Wild Rider Red: Apply a layer to the centre of each light source.

Stage 4

Bloodletter: Apply a light glaze across the light sources.

Finish by painting the base with the Base Painting guide.

Middle Earth SBG – Elves of the White Council

The time has finally come for paint to meet elf!

These have been awaiting paint for a while and, like the Inhumans, I found my inspiration and got stuck in!

Galadriel leads the White Council so I felt she was a suitable place to start the painting. It’s also a fairly simple sculpt and felt really small after some of the other miniatures I’ve done recently.

I’m theming the models around Dol Guldur, so I wanted to push the creepy feel on the bases but also on Galadriel herself. This is why I chose the colours for the robes, White to off green.

Celeborn felt like a natural follow on. I chose the colours to link him to Lothlorien, golden armour, and to Galadriel, the robes. I also added some floating leaves to both bases using thin wire and miniature leaves. I hope it comes across as the leaves in the wind I was trying to portray.

Last but definitely not least is Glorfindal. I wanted to keep up the spooky theme and keep this chap fairly sombre. He has died before after all. It’s a fairly monotone mini, with only the sword and the hair to really add some colour, but not a lot of warmth.

I’m really pleased with the end result, especially with the way it helps the blade stand out.

The last of the elves or the first of the wizards? Still not sure what I’ll work on next…

MCP – Captain America & Red Skull Painting Guide

Welcome to my latest painting guide!

I need your support. Because my guides takes time and supplies to do, any support you can offer would mean the world to me. A supportive message in the comments is enough, but if you have the means why not send me a gift on Ko-Fi or PayPal. Thank you!

Prep: Fully build both models and undercoat black.

Captain America

Stage 1

Caledor Sky: Apply a basecoat to the suit.

Khorne Red: Apply a basecoat to the gloves, boots and stripes.

Celestra Grey: Apply a basecoat to the alternative stripes, sleeves, wings and A’s.

Bugman’s Glow: Apply a basecoat to the skin.

Rhinox Hide: Apply a basecoat to the pouches and straps.

Leadbelcher: Apply a basecoat to the buckles and chest star.

Shield Stage 1

Caledor Sky: Apply a basecoat to the innermost ring.

Khorne Red: Apply a basecoat to the outer and inner circle.

Dawnstone: Apply a basecoat to the middle ring.

Leadbelcher: Apply a basecoat to the star.

Stage 2

Teclis Blue: Apply a layer to the suit.

Mephiston Red: Apply a layer to the gloves, boots and stripes.

Ulthuan Grey: Apply a layer to the alternative stripes, sleeves, wings and A’s.

Cadian Fleshtone: Apply a layer to the skin.

Mournfang Brown: Apply a layer to the pouches and straps.

Drakenhof Nightshade: Apply a shade to the buckles and star.

Shield Stage 2a

Teclis Blue: Apply a layer to the inner ring.

Mephiston Red: Apply a guideline to the outer and inner ring. Apply them where you would like the light shines to show. Also apply a line around the edges.

Celestra Grey: Apply a guideline to the middle ring. Also apply a line around the edges.

Drakenhof Nightshade: Apply a shade to the star.

Shield Stage 2b

Mephiston Red: Thin your paint, with water or Lahmian Medium, and begin to build up the colour in the rings, working back towards the guideline.

Celestra Grey: Repeat with the middle ring.

Stage 3

Lothern Blue: Apply a line highlight to the suit.

Evil Sunz Scarlet: Apply a line highlight to the gloves, boots and stripes.

White Scar: Apply a layer to the alternative stripes, sleeves, wings and A’s.

Basic Skin Tone 70.815(Vallejo): Apply a thinned layer to the skin.

Steel Legion Drab: Apply a line highlight to the pouches and straps.

Ironbreaker: Apply a line highlight to the buckles and star.

Shield Stage 3

Lothern Blue: Apply a line highlight to the inner ring.

Evil Sunz Scarlet: Repeat the same method from the previous stage. Apply a guideline and an edge highlight first, then build the colour towards the guideline, just make sure to leave a little of the previous colour showing to build the gradient.

Ulthuan Grey: Repeat with the middle ring.

Ironbreaker: Apply a line highlight to the star.

Stage 4

Blue Horror: Apply a spot highlight to the suit.

Wild Rider Red: Apply a spot highlight to the gloves, boots and stripes.

Light Flesh 70.928(Vallejo): Apply a spot highlight to the skin.

Karak Stone: Apply a spot highlight to the pouches and straps.

Stormhost Silver: Apply a spot highlight to the buckles and star.

Shield Stage 4

Blue Horror: Apply a spot highlight to the inner circle.

Wild Rider Red: Begin with the guidelineand Apply an edge highlight but not all the way around only a little arc above and below the guidelines. Then apply a very small amount of thinned paint around the guidelines.

White Scar: Repeat with the middle ring.

Stormhost Silver: Apply a spot highlight to the star.

Finish by painting the base with the Base Painting guide.

Red Skull

Stage 1

Incubi Darkness: Apply a basecoat to the stormcoat.

Eshin Grey: Apply a basecoat to the straps, shirt, gloves and boots.

Khorne Red: Apply a basecoat to the skin and hydra symbols.

Teclis Blue: Apply a basecoat to the cube.

Leadbelcher: Apply a basecoat to the buckles.

Stage 2

Thunderhawk Blue: Apply a layer to the stormcoat.

Dawnstone: Apply a layer to the straps, shirt, gloves and boots.

Mephiston Red: Apply a layer to the skin and hydra symbols.

Lothern Blue: Apply a layer to the centre of the cube.

Nuln Oil: Apply a shade to the buckles.

Stage 3

Russ Grey: Apply a line highlight to the stormcoat.

Celestra Grey: Apply a line highlight to the straps, shirt, gloves and boots.

Evil Sunz Scarlet: Apply a line highlight to the skin and hydra symbols.

Baharroth Blue: Apply a layer to the centre of the cube.

Drakenhof Nightshade: Apply a shade to the buckles.

Stage 4

Fenrisian Grey: Apply a spot highlight to the stormcoat.

Wild Rider Red: Apply a spot highlight to the skin.

White Scar: Apply a spot highlight to the centre of the cube and a line highlight to the edges.

Ironbreaker: Apply a spot highlight to the buckles.

Finish by painting the base with the Base Painting guide.

MCP – Sin & Viper Painting Guide

Welcome to my latest painting guide!

I need your support. Because my guides takes time and supplies to do, any support you can offer would mean the world to me. A supportive message in the comments is enough, but if you have the means why not send me a gift on Ko-Fi or PayPal. Thank you!

Prep: Fully build both models and undercoat black.

Sin

Stage 1

Khorne Red: Apply a basecoat to the boots and corset.

Incubi Darkness: Apply a basecoat to the trousers, gloves, gun and straps.

Bugman’s Glow: Apply a basecoat to the skin.

Leadbelcher: Apply a basecoat to the knife, buckles and chest skull.

Doombull Brown: Apply a basecoat to the hair.

Stage 2

Mephiston Red: Apply a layer to the boots, corset and hair.

Thunderhawk Blue: Apply a layer to the trousers, gloves, gun and straps.

Cadian Fleshtone: Apply a layer to the skin.

Nuln Oil: Apply a shade to the knife, buckles and chest skull.

Pallid Wych Flesh: Apply a layer to the teeth.

Stage 3

Evil Sunz Scarlet: Apply a line highlight to the boots, corset, hair and lips.

Russ Grey: Apply a line highlight to the trousers, gloves, gun and hair.

Basic Skin Tone 70.815(Vallejo): Apply a thinned layer to the skin.

Drakenhof Nightshade: Apply a shade to the knife, buckles and skull.

Stage 4

Wild Rider Red: Apply a spot highlight to the boots, corset and hair.

Fenrisian Grey: Apply a spot highlight to the trousers, gloves, gun and straps.

Light Flesh 70.928(Vallejo): Apply a spot highlight to the skin.

Ironbreaker: Apply a spot highlight to the knife, buckles and skull.

Finish by painting the base with the Base Painting guide.

Viper

Stage 1

Caliban Green: Apply a basecoat to the bodysuit and hair.

Warpstone Glow: Apply a basecoat to the boots, gloves and belt.

Leadbelcher: Apply a basecoat to the gun, sword and buckle.

Bugman’s Glow: Apply a basecoat to the skin.

Incubi Darkness: Apply a basecoat to the gun.

Rhinox Hide: Apply a basecoat to the pouch.

Stage 2

Kabalite Green: Apply a layer to the bodysuit and hair.

Moot Green: Apply a layer to the boots, gloves and belt.

Biel-tan Green: Apply a shade to the sword and buckle.

Cadian Fleshtone: Apply a layer to the skin.

Thunderhawk Blue: Apply a layer to the gun.

Mournfang Brown: Apply a layer to the pouch.

Stage 3

Sybarite Green: Apply a line highlight to the bodysuit and hair.

Gauss Blaster Green: Apply a line highlight to the boots, gloves and belt.

Ironbreaker: Apply a line highlight to the sword and buckle.

Basic Skin Tone 70.815(Vallejo): Apply a thinned layer to the skin.

Russ Grey: Apply a line highlight to the gun.

Steel Legion Drab: Apply a line highlight to the pouch.

Stage 4

Gauss Blaster Green: Apply a spot highlight to the bodysuit and hair.

Gauss Blaster Green/White Scar: Make a 1:1 mix and apply a spot highlight to the boots, gloves and belt.

Stormhost Silver: Apply a spot highlight to the sword and buckle.

Light Flesh 70.928(Vallejo): Apply a spot highlight to the skin.

Fenrisian Grey: Apply a spot highlight to the gun.

Karak Stone: Apply a spot highlight to the pouch.

Finish by painting the base with the Base Painting guide.

MCP – Mister Sinister Painting Guide

Welcome to my latest painting guide!

I need your support. Because my guides takes time and supplies to do, any support you can offer would mean the world to me. A supportive message in the comments is enough, but if you have the means why not send me a gift on Ko-Fi or PayPal. Thank you!

Prep: Fully build the model and undercoat black. I regret not keeping the cape seperate

Stage 1

Kantor Blue: Apply a basecoat to the main body and chamber glass.

Incubi Darkness: Apply a basecoat to the boots, gloves, hair and outer cloak.

Barak-Nar Burgundy: Apply a basecoat to the interior of the cape.

Rakarth Flesh: Apply a basecoat to the skin.

Leadbelcher: Apply a basecoat to the chamber base.

Warpstone Glow: Apply a basecoat to the chamber smoke.

Mephiston Red: Apply a basecoat to the chest and forehead symbol.

Stage 2

Thunderhawk Blue: Apply an edge highlight and then a thinned layer, focussing down the centre of the arms legs and each side of the chest. Also apply a layer to the boots, gloves, hair and outer cloak.

Khorne Red: Apply a layer to the inner cloak and collar.

Pallid Wych Flesh: Apply a layer to the skin.

Drakenhof Nightshade: Apply a shade to the chamber base.

Moot Green: Apply a layer to the lower section of the smoke.

Evil Sunz Scarlet: Apply a layer to the chest and forehead symbols.

Incubi Darkness: Apply a layer to the eye sockets and mouth.

Kabalite Green: Apply a layer to the top of the chamber glass.

Stage 3

Russ Grey: Apply a line highlight to the body, gloves, boots, cape and hair.

Mephiston Red: Apply an edge highlight to the inner cloak, collar and a layer to the eyes.

White Scar: Apply a line highlight to the skin.

Nuln Oil: Apply a shade to the chamber base.

Moot Green/Gauss Blaster Green: Make a 1:1 mix and apply a layer to the the lower sections of the smoke.

Wild Rider Red: Apply an edge highlight to the chest symbol and a spot highlight to the forehead symbol.

Pallid Wych Flesh: Apply a layer to the teeth.

Sybarite Green: Apply an edge highlight to the top of the glass.

Stage 4

Fenrisian Grey: Apply a spot highlight to the body, gloves, cape and hair.

Evil Sunz Scarlet: Apply a spot highlight to the inner cloak, collar and eyes.

Canoptek Alloy: Apply a line highlight to the chamber base.

Gauss Blaster Green: Apply a thinned layer to the lower mass of the smoke and a spot highlight to the chamber glass.

Finish by painting the base with the Base Painting guide.

MCP – Quicksilver & Scarlet Witch Painting Guide

Welcome to my latest painting guide!

I need your support. Because my guides takes time and supplies to do, any support you can offer would mean the world to me. A supportive message in the comments is enough, but if you have the means why not send me a gift on Ko-Fi or PayPal. Thank you!

Prep: Fully build both models and undercoat black.

Quicksilver

Stage 1

Caledor Sky: Apply a basecoat to the bodysuit.

Celestra Grey: Apply a basecoat to the suit pattern, boots, gloves and hair.

Bugman’s Glow: Apply a basecoat to the skin.

Mephiston Red: Apply a basecoat to the explosion.

Stage 2

Teclis Blue: Apply a layer to the bodysuit.

Ulthuan Grey: Apply a layer to the suit pattern, boots, gloves and hair.

Cadian Fleshtone: Apply a layer to the skin.

Trollslayer Orange: Apply a thinned layer of the centre of the explosion.

Skavenblight Dinge: Apply a layer to the out most areas of the explosion.

Stage 3

Lothern Blue: Apply a thinned layer to the bodysuit.

White Scar: Apply a thinned layer to the suit pattern, boots, gloves and hair.

Basic Skintone 70.815(Vallejo): Apply a thinned layer to the skin.

Yriel Yellow: Apply a thinned layer to the explosion moving closer than the last stage.

Abaddon Black: Apply a thinned layer to the tips of the explosion.

Stage 4

Blue Horror: Apply a line highlight to the suit.

Light Flesh 70.928(Vallejo): Apply a spot highlight to the skin.

Dorn Yellow: Apply a spot highlight to the centre of the explosion.

Finish by painting the base with the Base Painting guide.

Scarlet Witch

Stage 1

Mephiston Red: Apply a basecoat to the bodysuit, cape, boots, gloves and tiara.

Emperor’s Children: Apply a basecoat to the undersuit.

Screamer Pink: Apply a basecoat to the magic.

Bugman’s Glow: Apply a basecoat to the skin.

Khorne Red: Apply a basecoat to the hair.

Stage 2

Evil Sunz Scarlet: Apply a thinned layer and edge highlight to the bodysuit, cape, boots, gloves and tiara. Apply a layer to the magic.

Fulgrim Pink: Apply a layer to the undersuit.

Cadian Fleshtone: Apply a layer to the skin.

Wazdakka Red: Apply a layer to the hair.

Stage 3

Evil Sunz Scarlet/Slaanesh Grey: Make a 1:1 mix and apply a line highlight to the bodysuit, cape, boots, gloves and tiara.

Pink Horror: Apply a thinned layer to the magic.

Fulgrim Pink: Apply a thinned layer to the undersuit.

Basic Skin Tone 70.815(Vallejo): Apply a thinned layer to the skin.

Squig Orange: Apply a line highlight to the hair.

Stage 4

Slaanesh Grey: Apply a spot highlight to the bodysuit, cape, boots, gloves and tiara.

Emperor’s Children: Apply a spot highlight to the magic.

Fulgrim Pink/White Scar: Make a 1:1 mix and apply a line highlight to the undersuit.

Light Flesh 70.928(Vallejo): Apply a spot highlight to the skin.

Bloodletter: Apply a glaze to the hair.

Finish by painting the base with the Base Painting guide.

MCP – Crystal & Lockjaw Painting Guide

Welcome to my latest painting guide!

I need your support. Because my guides takes time and supplies to do, any support you can offer would mean the world to me. A supportive message in the comments is enough, but if you have the means why not send me a gift on Ko-Fi or PayPal. Thank you!

Prep: Fully build both models and undercoat black.

Crystal

Stage 1

Zamesi Desert: Apply a basecoat to the hair.

Bugman’s Glow: Apply a basecoat to the skin.

XV-88: Apply a basecoat to the bodysuit.

Caledor Sky: Apply a basecoat to the water.

Incubi Darkness: Apply a basecoat to the bodysuit patterning and gloves and boots.

Trollslayer Orange: Apply a basecoat to the flames.

Stage 2

Agrax Earthshade: Apply a shade to the hair.

Cadian Fleshtone: Apply a layer to the skin.

Averland Sunset: Apply a layer to the bodysuit 

Lothern Blue: Apply a thinned layer to the water.

Thunderhawk Blue: Apply a layer to the bodysuit patterning and boots and gloves.

Fire Dragon Bright: Apply a thinned layer to the centre of the flames.

Stage 3

Blonde Hair 9257(MSP): Apply a line highlight to the hair.

Basic Skintone 70.815(Vallejo): Apply a thinned layer to the skin.

Yriel Yellow: Apply a line highlight to the bodysuit and a thinned layer to the centre of the flames.

Blue Horror: Apply a thinned layer to the edges of the water.

Stage 4

Blonde Highlight 9258(MSP): Apply a spot to the hair.

Light Flesh 70.928(Vallejo): Apply a spot highlight to the skin.

Phalanx Yellow: Apply a spot highlight to the bodysuit and fire.

White Scar: Apply a spot highlight to the water.

Fenrisian Grey: Apply a spot highlight to the bodysuit lining, boots and gloves.

Finish by painting the base with the Base Painting guide.

Lockjaw

Stage 1

XV-88: Apply a basecoat to the fur.

Eshin Grey: Apply a basecoat to the forehead symbol.

Rhinox Hide: Apply a basecoat to the snout and around the ears and a glaze around the eyes.

Screamer Pink: Apply a basecoat to the mouth and tongue.

White Scar: Apply a basecoat to the eyes.

Blue Horror: Apply a basecoat to the saliva.

Flayed One Flesh: Apply a basecoat to the teeth.

Stage 2

Balor Brown: Apply a layer to the fur.

Russ Grey: Apply a layer to the forehead symbol.

Mournfang Brown: Apply a thinned layer to the snout.

Emperor’s Children: Apply a layer to the mouth and tongue.

Teclis Blue: Apply a circle to the centre of each eye.

Pallid Wych Flesh: Apply a layer to the saliva and teeth.

Thunderhawk Blue: Apply a layer to the nose.

Stage 3

Zandri Dust: Apply a thinned layer to the fur.

Blue Horror: Apply a line highlight to the forehead symbol.

Steel Legion Drab: Apply a line highlight to the snout.

Fulgrim Pink: Apply a line highlight to the mouth and tongue.

Abaddon Black: Apply the pupils to the eyes.

White Scar: Apply a spot highlight to the saliva and teeth.

Russ Grey: Apply a spot highlight to the nose.

Stage 4

Flayed One Flesh: Apply a spot highlight to the fur and the snout.

White Scar: Apply a spot highlight to the forehead symbol and the eyes.

Fulgrim Pink/White Scar: Make a 1:1 mix and apply a spot highlight to the mouth and tongue.

Fenrisian Grey: Apply a spot highlight to the nose.

Finish by painting the base with the Base Painting guide.

Back in the Saddle!

I’m finally back and ready to paint! It’s been a tough couple of years for everyone and I’m no exception. I’ve not been posting due to mental illness, general stress and a little bit of painting fatigue. I may write a bit more about that in the future. After a good amount of self care I’m feeling ready to jump back in the saddle and get some content out there.

I’m jumping straight back into guides for Marvel: Crisis Protocol. I took a bit of a break from this over the last few months, which is where the fatigue comes in. The Inhumans managed to form a painting block on me, and I just couldn’t find the inspiration to break it. This week I managed to break through that barrier…

You can find a guide for this pair here, alongside another new guide for Captain Marvel & Crossbones, with Crystal & Lockjaw not far behind.

I’ve also steadily been working away on articles for Tabletop Gaming magazine and I’ll be adding more information about these soon, but for now enjoy some pretty pictures from the guides…

I’d also like to say thank you to those who keep coming back for more and/or checked up while I was absent, and sorry to those whose comments I didn’t get back to.

Until next time, be excellent to each other!

MCP – Captain Marvel & Crossbones Painting Guide

Welcome to my latest painting guide!

I need your support. Because my guides takes time and supplies to do, any support you can offer would mean the world to me. A supportive message in the comments is enough, but if you have the means why not send me a gift on Ko-Fi or PayPal. Thank you!

Prep: Fully build both models and undercoat black.

Captain Marvel

Stage 1

Kantor Blue: Apply a basecoat to the bodysuit.

Khorne Red: Apply a basecoat to the reds; the boots, sash, gloves and shoulders.

Averland Sunset: Apply a basecoat to the lining.

Bugman’s Glow: Apply a basecoat to the skin.

Zamesi Desert: Apply a basecoat to the hair.

Stage 2

Caledor Sky: Apply a layer to the bodysuit.

Mephiston Red: Apply a layer to the reds.

Agrax Earthshade: Apply a shade to the hair and lining.

Cadian Fleshtone: Apply a layer to the skin.

Stage 3

Teclis Blue: Apply a highlight to the bodysuit.

Evil Sunz Scarlet: Apply a highlight to the reds.

Yriel Yellow: Apply a line highlight to the lining.

Basic Skintone 70.815(Vallejo): Apply a highlight to the skin.

Blonde Hair 9257(MSP): Apply a layer to the hair.

Stage 4

Baharroth Blue: Apply a line highlight to the bodysuit

Wild Rider Red: Apply a line highlight to the reds.

Dorn Yellow: Apply a spot highlight to the lining.

Light Flesh 70.928(Vallejo): Apply a spot highlight to the skin.

Blonde Highlight 9258(MSP): Apply a spot highlight to the hair.

Finish by painting the base with the Base Painting guide.

Crossbones

Stage 1

Incubi Darkness: Apply a basecoat to the bodysuit, gloves and mask.

Eshin Grey: Apply a basecoat to the straps, pouches and holster.

Celestra Grey: Apply a basecoat to the face mask design.

Leadbelcher: Apply a basecoat to the clasps, knee guards and knuckle dusters.

Bugman’s Glow: Apply a basecoat to the skin.

Stage 2

Thunderhawk Blue: Apply a layer to the bodysuit, gloves and mask.

Dawnstone: Apply a layer to the straps, pouches and holster.

Ulthuan Grey: Apply a layer to the face mask design.

Nuln Oil: Apply a shade to the clasps, knee guards and knuckle dusters.

Cadian Fleshtone: Apply a layer to the skin.

Stage 3

Russ Grey: Apply a line highlight to the bodysuit, gloves and mask.

Celestra Grey: Apply a line highlight to the straps, pouches and holster.

White Scar: Apply a layer to the face mask design.

Drakenhof Nightshade: Apply a shade to the clasps, knee guards and knuckle dusters.

Basic Skintone 70.815(Vallejo): Apply a thinned layer to the skin.

Stage 4

Fenrisian Grey: Apply a spot highlight to the bodysuit, gloves and mask.

Krieg Khaki: Apply a spot highlight to the straps, pouches and holster.

Ironbreaker: Apply a line highlight to the clasps, knee guards and knuckle dusters.

Light Flesh 70.928(Vallejo): Apply a spot highlight to the skin.

Finish by painting the base with the Base Painting guide.