Deadzone – Personalised Stat Cards!

I had an idea a while back for some personalised stat cards to go along side the Rebs, primarily because I love fiddling about on photoshop and having wee extras like this for my forces (hence all the logos and pitches for my DB teams :)). I then thought I would take it a step further and make some additions that would help out when playing in a campaign, such as space to add abilities, keep track of stat increases, exp, vet dice etc. and came up with these…

set Set1 Set-2 Set-3 Set-4 Set-5 Set-6

I also quickly realised this allowed me to have duplicates making it easier to keep track of the individual figures progress and in-game whatever items they may be lugging about. I have so far left the stat boxes, points etc. blank as the idea is to have them in card slips and be able to mark these in and change them as they progress, although I am thinking of having the original stats in place just faded a bit as a reminder of how far they can go up or if they die and are effectively reset. The only other thing I was considering was an item box to show what they are carrying or the room they have left. Although I think I may be restricted in space a fair bit, especially when it comes to the Zees who would need 3!

Anyway I would love to hear peoples thoughts on these and if there are any changes or additions you would make? It may also be on the cards (hehehe ;)) that I make up a generic one for general use if people thought it would be useful?

Deadzone – Extra Buildings!

I had one set of terrain left over still to build and decided I would do something a little bit different with it. The idea was to have a couple of structures that had a clear use before the containment protocol was put into effect.

The first I decided was going to be a small cafe like place…

Extra-1

I’m going to add one of the Antenocitis extractr fans to the roof as well as a couple of the vending machines in the wee alcove on the right to further add to it. I used plasticard to create the counter as well as a flat area to create a sign.

The second building is going to be something of a small bar…

Extra-2

This is going to have one of the larger extractors on top and the idea is to give it a bit a of a rebel theme, but have it looking burned out and abandoned, as though the local law enforcement didn’t look too kindly on the revolutionist ideals of the clientele. I’m also going to add to this by boarding up the windows and doors, this should add to the story of the building but also lets me have some LOS blocking terrain.

I’m still deciding whether these shold be the same colour as the rest of the terrain or something more in line with the character I’m trying to portray, would love to hear what you think?

Deadzone – Antenocitis Workshop Extras!

I decided to get some Antenocitis Workshop products to continue in my efforts to add a bit more character to the Deadzone Board, and it’s looking really good…

Antenocitis-2 Antenocitis-3

I added a couple of the supports from the Deadzone terrain sprues to the backs of the billboards so they would be freestanding, this means I’ll be able to shift them about between games 🙂

Antenocitis-1 Antenocitis-4

These are primarily to add a bit more to some of the buildings and for a couple of more scenic buildings I have in mind

Antenocitis-5

As I had already added some pasted on posters I wanted to add some more ‘official’ advertising areas

Antenocitis-6

These are going to be used to add a bit more cover

Antenocitis-7And finally some vending machines, a couple for the extra buildings I mentioned earlier, and the others just to scatter about 🙂

Overall I’m really impressed with the quality of this stuff. It only really needs some minor filing and a quick wash and it’s ready to go. Will definately be keeping my eye on Antenocitis Workshop 🙂

Deadzone – Rebs Kraaw Finished!

Another step closer to the Rebs being complete 🙂

Kraaw-4 Kraaw-5

For these guys it’s only really the flesh colour that was done any differently from the rest of the Rebs and this is how it was done:

Kraaw Flesh: Basecoat of Zamesi Desert followed by a wash of Seraphim Sepia

Layer of Zamesi Desert leaving the recesses the basecoat colour

Highlight of 2:1 Zamesi Desert and Menoth White Highlight

Fine highlight of 1:1 Zamesi Desert and Menoth White Highlight

The only other thing a little bit different I added was the stippling pattern on the wings, I achieved this by simply adding small dots of Zamesi desert where required 🙂

Deadzone – Rebs Kraaw, Medic and Commander Started!

I’m now onto the last of the reinforcements for my Rebs force….

Alt-Commander-3 Alt-Commander-4 Kraaw-2 Judwan-2

As with the rest of the force I started off with the armour, then the black cloth and put down some basecoats…

Alt-Commander-&-Medic Kraaw-3

Here’s what I did to start them off…

Black Human Flesh: Basecoat of Doombull Brown followed by a light wash of Agrax Earthshade

Judwan Flesh: 2:1 mix of Mechanicus Standard Grey and Rakkarth Flesh followed by a light wash of Seraphim Sepia

Kraaw Flesh: Basecoat of Zamesi Desert followed by a wash of Seraphim Sepia

Deadzone -TK Zero Weapons Team Finished!

These guys have been a pleasure to paint and I really am in love with the models. Even more excited to get a whole team of Sphyr for DBX now 😀

TK-4 TK-5So with me having gone over the colours used for the majority of the models in my previous posts (Here, here and here), I’m just going to give a rundown of the other areas:

Sphyr Flesh: Basecoat all over of Lothern Blue followed by a wash of Drakenhof Nightshade

Add a coat of Lothern Blue but leave the recesses the basecoat colour

Highlight of 2:1 Lothern Blue and Menoth White Highlight

Highlight 1:1 Lothern Blue and Menoth White Highlight

Human Flesh: Basecoat of 2:1 mix of Rakkarth Flesh and Pink Horror followed by a light Agrax Earthshade wash

Add a coat of 1:1:1 Rakkarth Flesh, Pink horror and Menoth White Highlight but leave the recesses the basecoat colour

Add a small amount of Menoth White Highlight to this mix and add a Highlight

The only other thing added was the Hazard markings on the gun, these were done in the same style as the Dreadball bases I’ve done previously.

Deadzone -TK Zero Weapons Team Started!

I’ve been looking forward to painting these as I love the look of the Sphyr (can’t wait to get a team in DBX :D) and thought I could do something funky with the massive gun 🙂

TK-2

I started them off the same as the Zees and the Terrain by getting the armour ready

I then Painting the black cloth sections as I did with the Zees and got some basecoats down:

Sphyr Flesh: Basecoat all over of Lothern Blue followed by a wash of Drakenhof Nightshade

Human Flesh: Basecoat of 2:1 mix of Rakkarth Flesh and Pink Horror followed by a light Agrax Earthshade wash

TK-3I also added the other basecoats that go on all of the Rebs, the ryad Bark for the leather and Khorne Red for the reds.

I have also added a section of Khorne Red on the front of the gun that’s not in the image. I want to have at least a small part of red on each of the models to help tie them all together, beyond just the armour colour. The plan is to make the gun look a bit fancier than the rst of the tech the Rebs have 🙂

Deadzone – Rebs Zees Finished!

Another couple of additions to m Rebs force. Think these guys would come in handy in a campaign…

Zees-4

To Finish them off I needed to paint the flesh, leather and red bits, and here’s how I did those:

Flesh: The flesh was finished by adding a small amount of Rakkarth Flesh to Mechanicus standard Grey, and layering it on as it gets progressively lighter but using smaller amounts each time, focused on the edges.

Eyes: I started these off with a coat of Genestealer Purple

3:1 Genestealer Purple and Menoth White Highlight was added and painted on but leaving the edges of the eye the original colour

1:1 Genestealer Purple and Menoth White Highlight is added and painted only in the centre of the eyes

Leather: Over the Dryad Bark base I added two highlights

The first is 2:1 Dryad bark and Ushabti Bone

The second 1:1 Dryad bark and Ushabti Bone

Reds: Over the Khorne Red base:

Layer of Mephiston Red leaving the recesses the original colour

Highlight of Evil Sun Scarlet

Highlight of 1:1 Evil Sun Scarlet and Tau Light Ochre

and finally a wash of Bloodletter

Zees-5

The only other thing I had to paint was the base and here are the stages I went through:

A basecoat of Mechanicus Standard Grey over the whole thing

Drybrush of Codex Grey

Drybrush of Fortress Grey

Light Drybrush of Terminatus Stone

Wash of 5:1 water and Dryad Bark

And thats the basics of how I’ve painted my Rebs. The only bits that tend to differ are the flesh as they’re otherwise quite uniformed. But I’m planning on covering some other species once I get them done 🙂

Deadzone – Reb Zees Started!

I’ll be painting this second lot of Rebs up in batches like the last lot, and I thought I’d start out with the Zee’s, most the stages apply to all of the Reb models I’ve done in the past, bar any flesh…

Zees-2The armour is where I start on these guys, as it’s done the same way as the scenery was painted. As this can be a messy method best to get it in first so I don’t ruin what will follow 🙂

Zees-3Next up was the cloth, which I painted with the following from a black base:

Highlight of Mechanicus Standard Grey with a touch of Hawk Turquoise

Highlight of Codex Grey with a touch of Hawk Turquoise

Fine Highlight of Fortress Grey with a touch of Hawk Turquoise

Was of Nuln oil mixed with a bit of Lahmian Medium

Folling this I only applied the first few coats to some of the other areas

Flesh was a 2:1 mix of Mechanicus Standard Grey and Rakarth Flesh, followed by a light wash of Seraphim Sepia

Leather was a coat of Dryad Bark

On the red I laid down a basecoat of Khorne red

And finally the pistols were given a coat of Leadbelcher followed by a light Agrax Earthshade wash

And thats how they got to their current stage. Next up I’ll need to finalise the areas I’ve got a base down and then the bases, shouldn’t take too long on these little fellas 😀

Deadzone – Signs & Posters!

Title

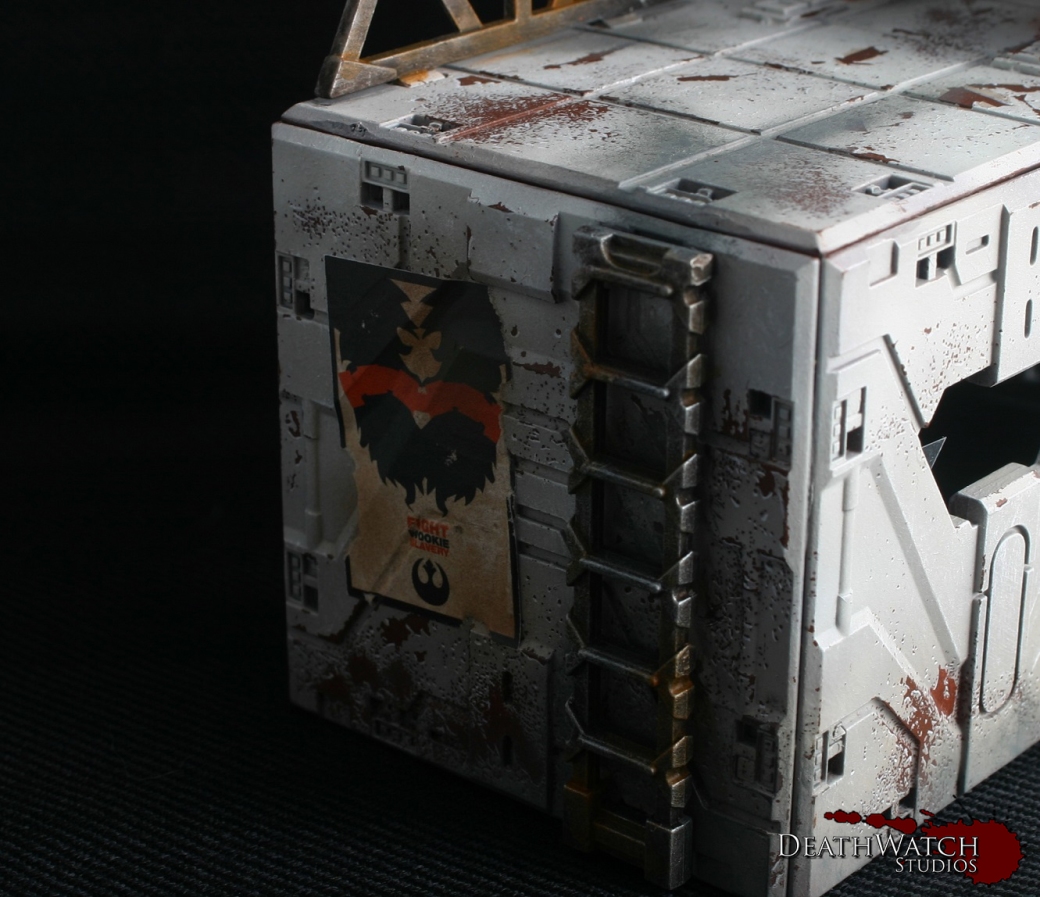
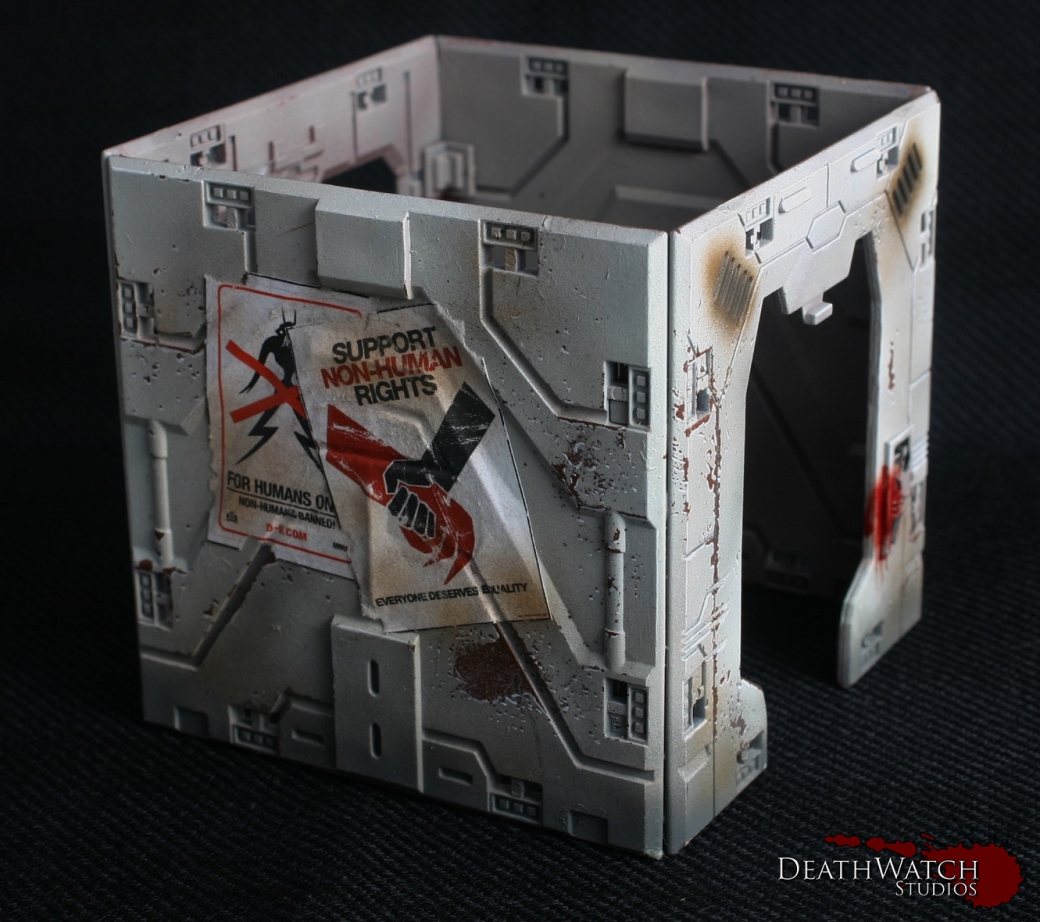
Over the weekend I decided to try something a wee bit different to add a little extra character to the Deadzone terrain, signposts and posters 🙂

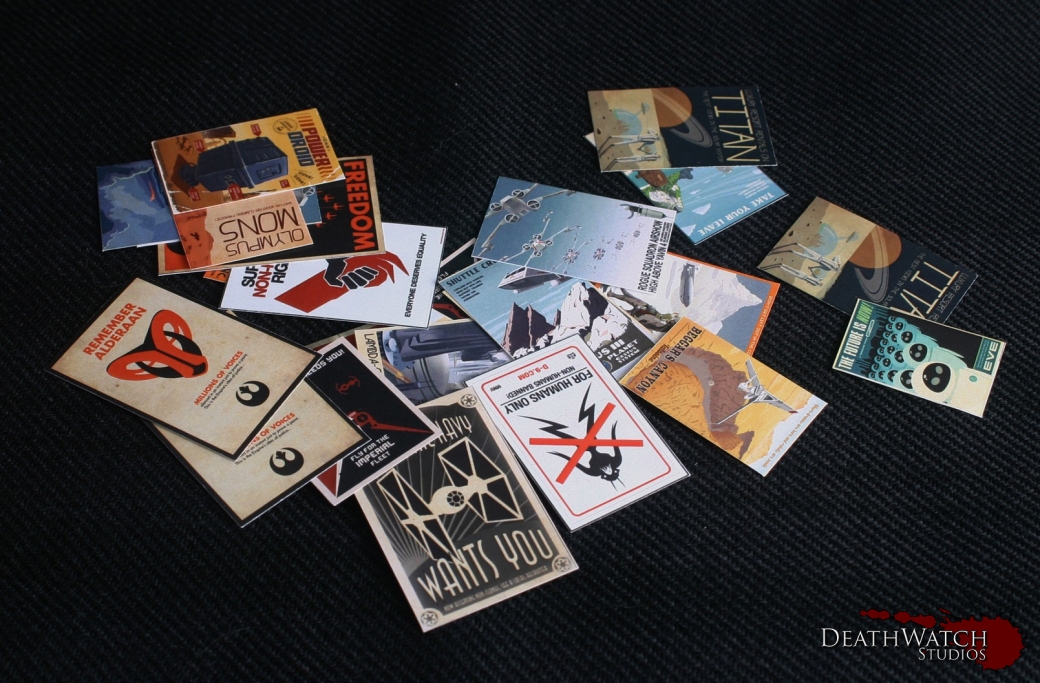
The posters have I had not seen done before(until this weekend that is, when a few images were spotted on the Containment Protocol facebook page) I wanted to supply a wee bit of knowledge as to how to do it. First things first you need some images, I scoured the web looking for appropriate designs and cam up with a fair amount…

PostersThese will keep me going for a wee while 🙂

I know there is also a fantastic resource on the aforementioned facebook page in the files section (Kudos to Mr Patterson for those :)), in the form of a pdf filled to the brim with great designs.

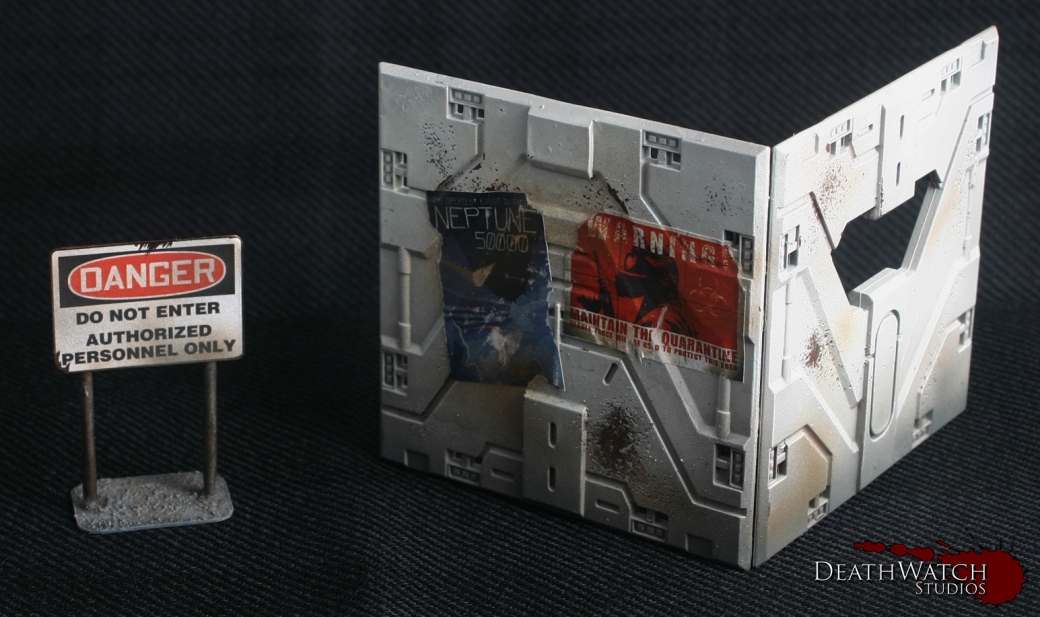
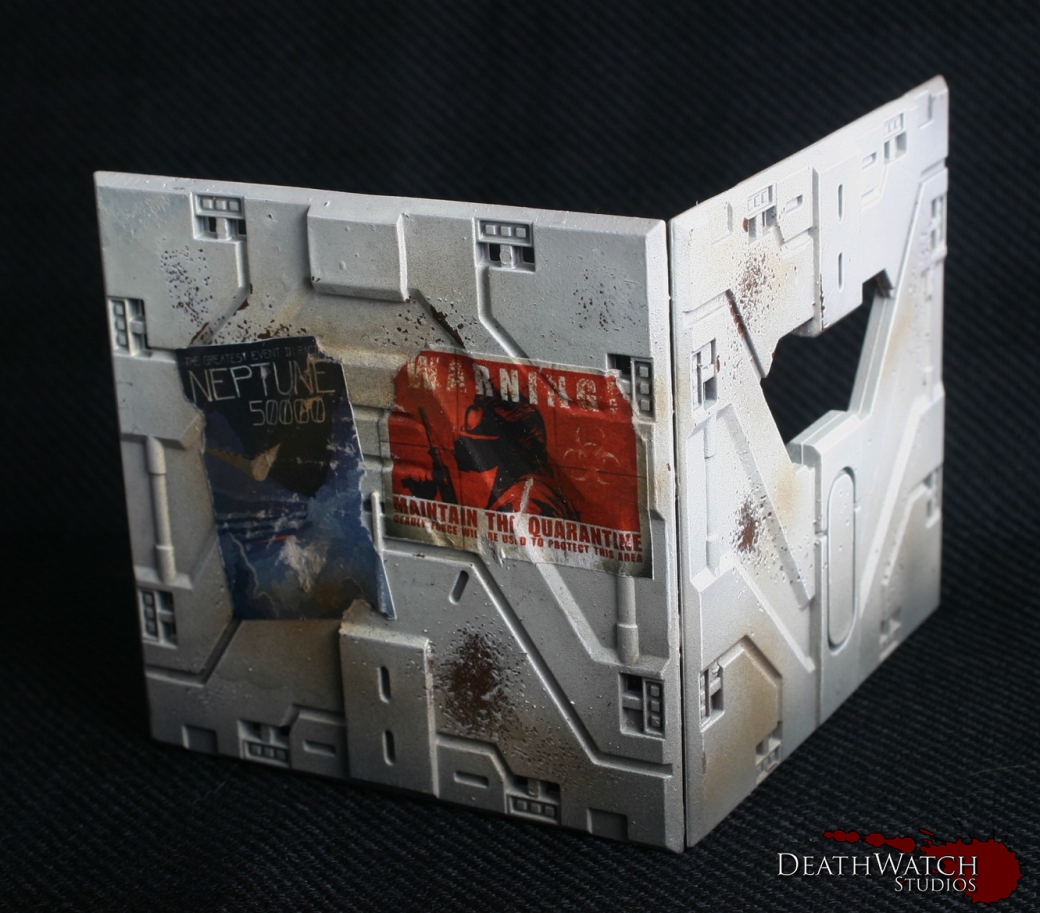
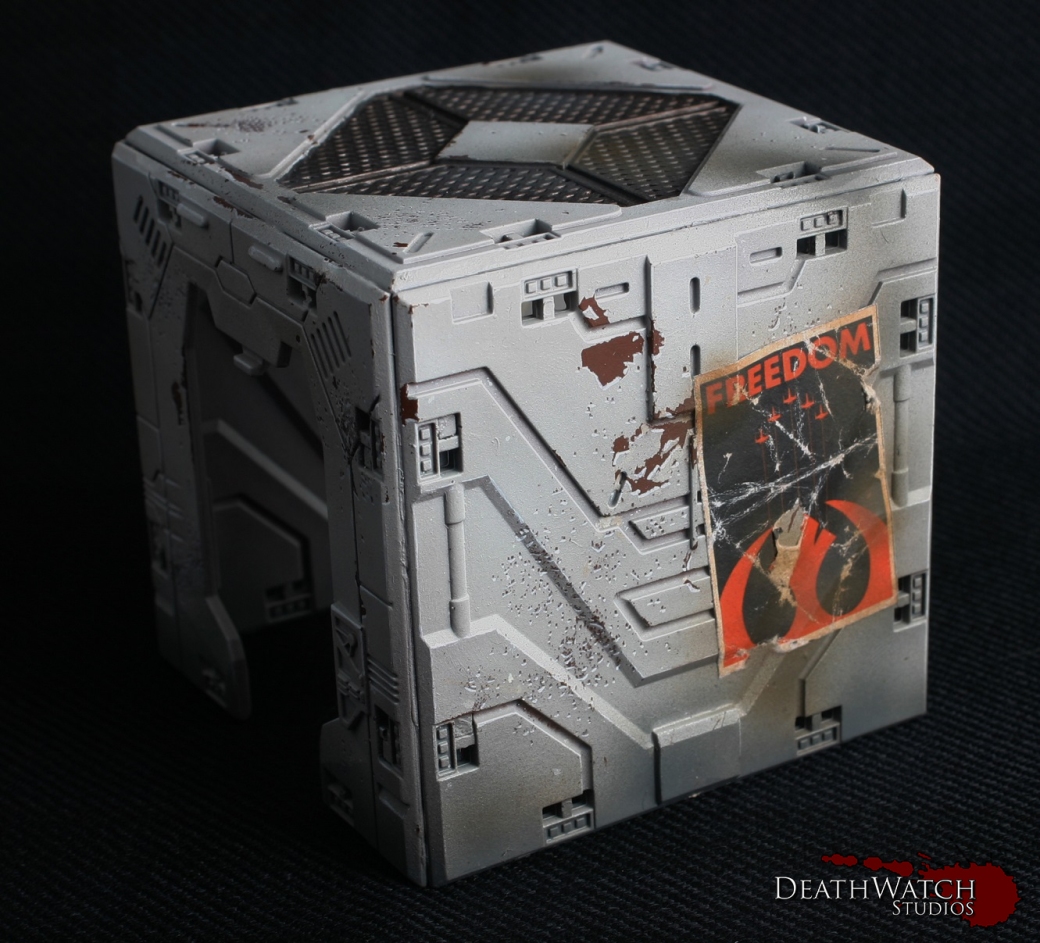
Once these have been scaled and printed they were carefully cut out in preparation for applying. Before sticking them on I distressed them a little by either scrunching them up then flattening again or by tearing small sections from around the edges. To stick them on I gave it the old dry run, figuring out where a poster would go before any stickiness was applied. Once I had found the right location I affixed them in a paper mache style. I got a small tub and mixed some pva with water, at least 4 parts water to 1 part pva, dipped the poster in and scraped off any excess liquid. This was then applied to the area I wanted it and smoothed down, then left to dry. Here’s how they look…

Poster-1 Poster-2 Poster-3 Poster-4

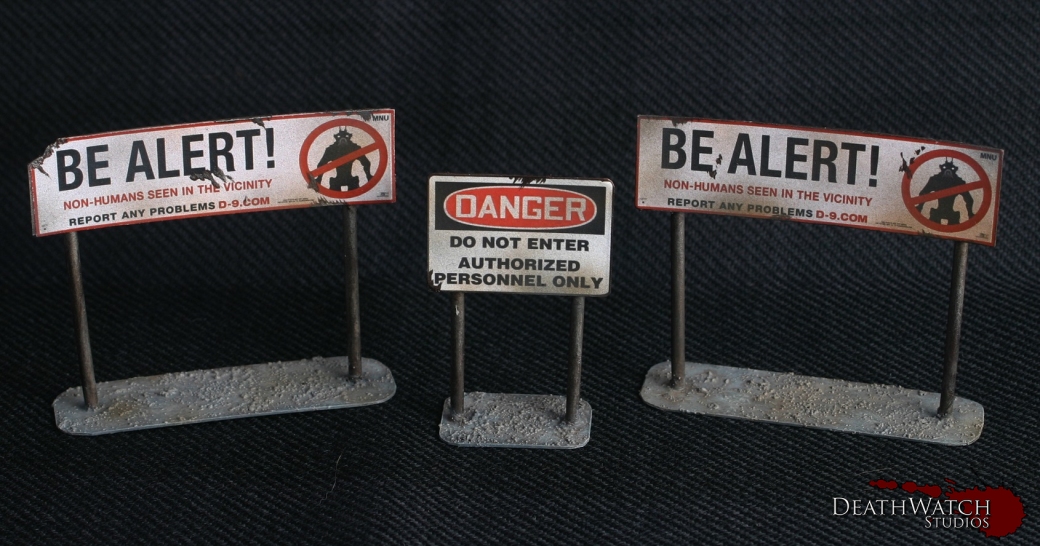
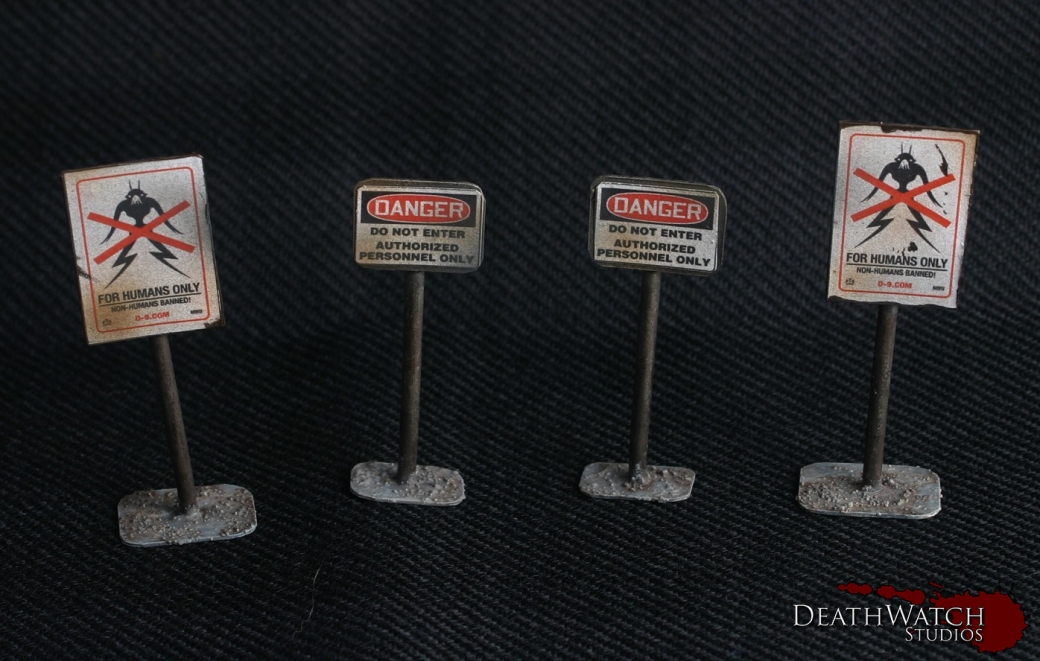
The next thing I wanted to try out was some signs, primarily to add that touch of character I was talking about but also to give a few extra pieces of cover. These where made from a thing sheet of plasticard, some plastic tubing and the similar printouts to the posters. I started by cutting out and measuring the poster bits and cutting a section of plasticard to the same size. I then cut two or one(depending on the size of the sign) sections of plastic tubing out and glued these to the backs of the section of plasticard, making sure they were level at the bottom. The next bit to make was the base, I cut another section of plasticard this time winging it on the size but just making sure it was roughly the same length as the sign but deeper. Once cut I glued the sign to this. Once dry I then applied a coat of GW Astrogranite over the base to give it some texture.

Once all of that was dry it was onto painting them. I undercoated the whole thing black and used the following paints for each section:

Sign: Drybrush of Warplock bronze

Drybrush of Leadbelcher

Agrax Earthshade wash

Base: Coat of Mechanicus Standard Grey

Drybrush of Codex Grey

Drybrush of Fortress Grey

Drybrush of Terminatus Stone

Coat of extremely watered down Dryad Bark

I left all that to dry and then aplied the sign decal in exactly the same fashion as the posters, with watered down pva glue. Then applied a wee bit of weathering by adding some scrapes with Warplock Bronze and a few very light drybrushes of a 1:1 mix of Dryad Bark and XV-88, and another few light drybrushes of Mechanicus Standard grey, here and there. That all gave me these…

Large-Signs Small-Signs